So remember I said I have an addiction to Pottery Barn? I wasn't joking. I probably have 30 of their catalogs saved in our house with pages tabbed of rooms I like/things I want (somebody call Hoarders). I also wander around the store and take pics of design ideas and store them in my iphone. Yea, before pinterest I had my own little version of "boards".
Anyway, one of my recently hoarded pictures was the caged table lamp. I loved everything about this lamp, except the price tag, $169.00 eek. Seemed like a good opportunity to DIY. It seemed easy enough, a lantern and a lamp kit and then TA-DA. Do you know how difficult it is to find a GOOD looking bubbled glass lantern?? Ummm impossible. So I gave up...would I never have these gorgeous lamps??
Long story shortish...my friend Kelly took me to The Christmas Tree Shops last weekend and there minding their own business were the most glorious things I've ever seen! BUBBLE GLASS LANTERNS - $24.99. Well little ladies, you're coming home with me. So here is my tale of how to make your own knock off pottery barn lamp.
 |
| The Inspiration - Pottery Barn Caged Table Lamp |
Knock-off Caged Table Lamp
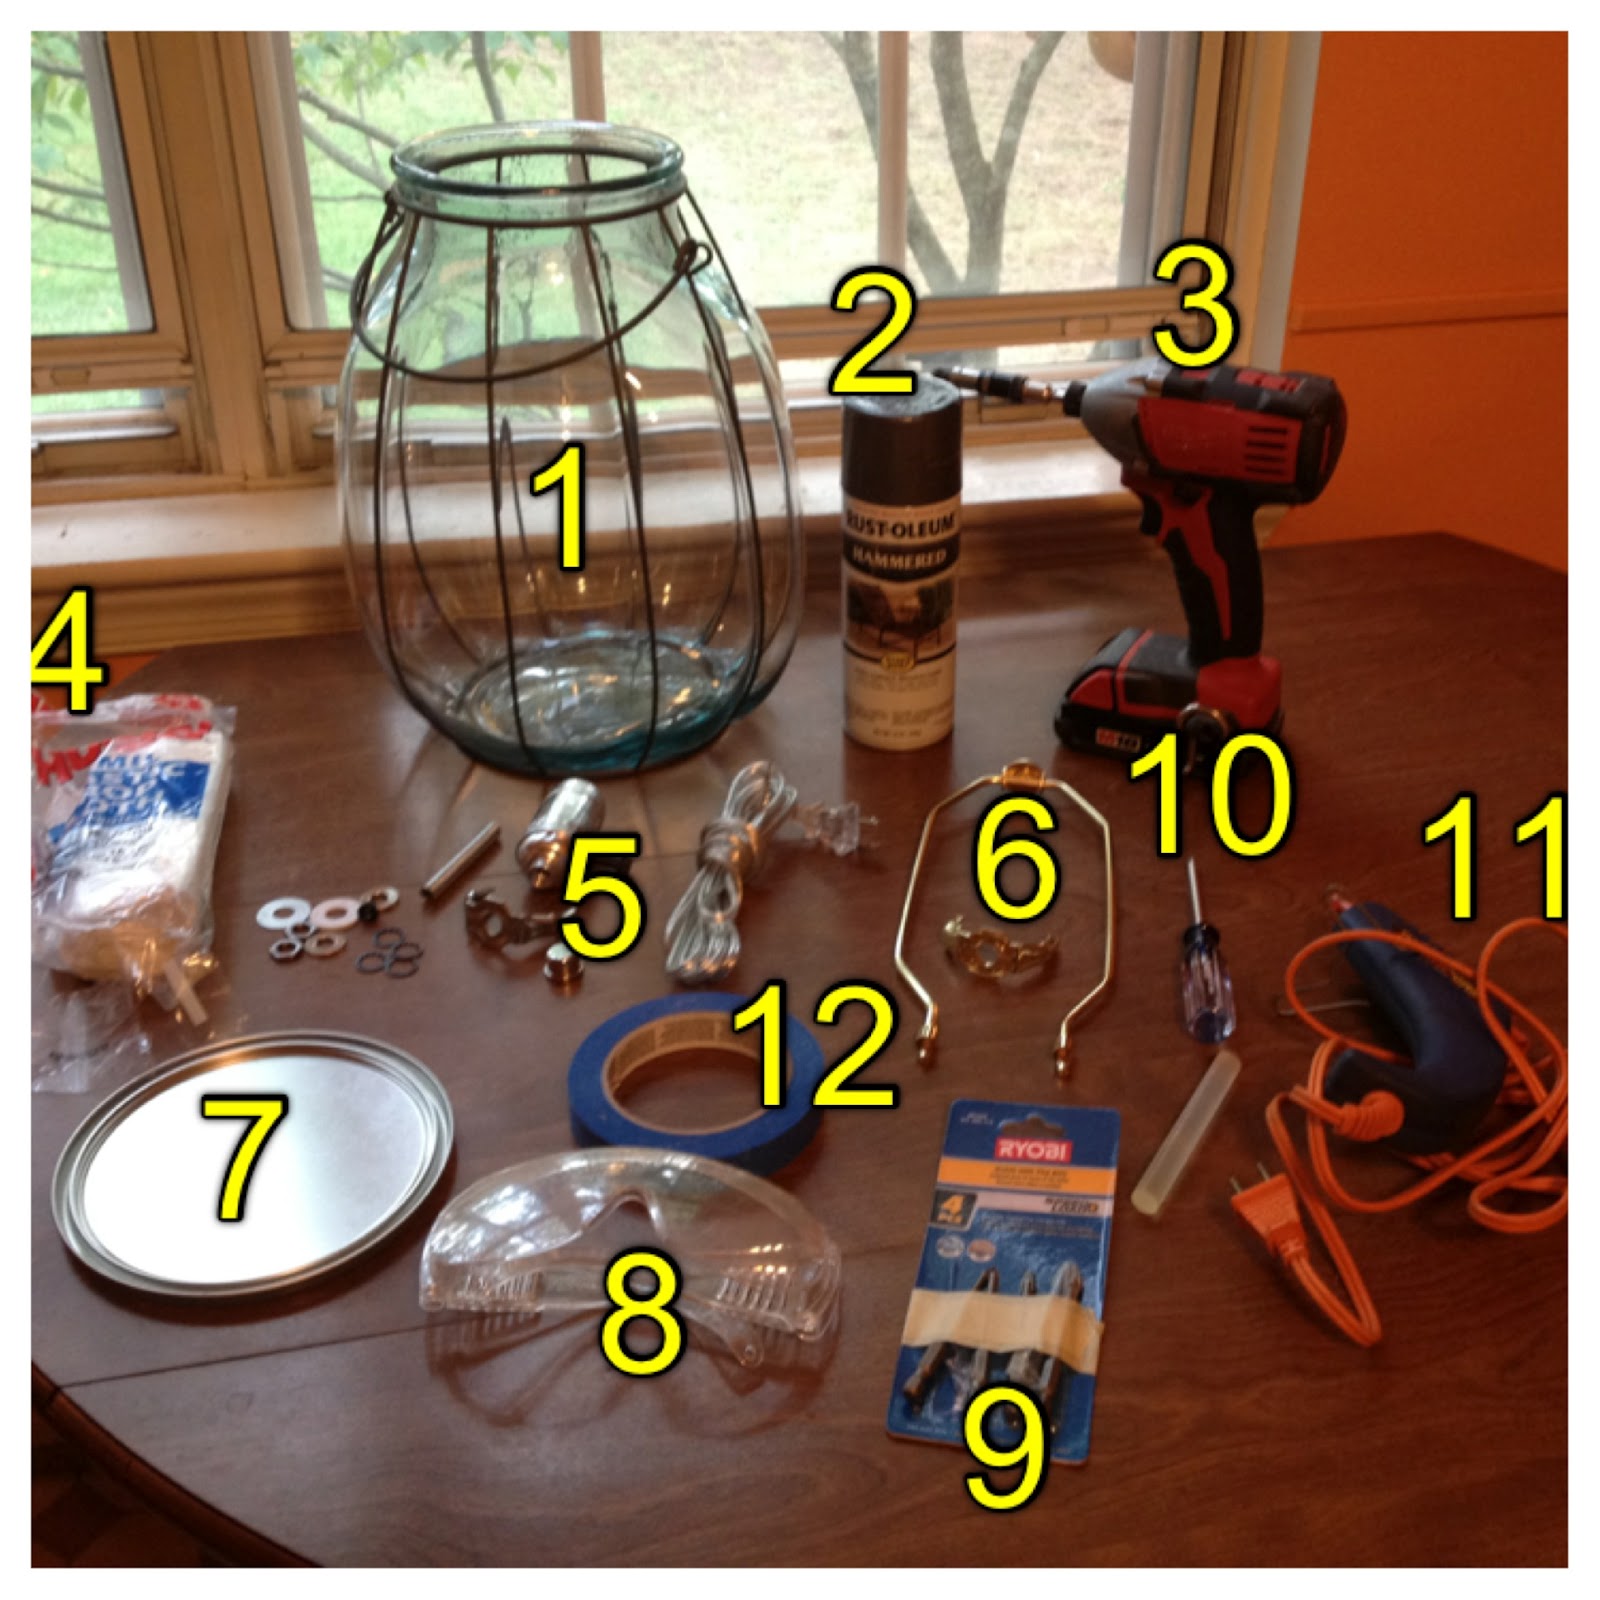
Tools Required (Per Lamp):
- Bubble Glass Lantern - I found mine at the Christmas Tree Shops
- (1) Can of Spray Paint - I used Rustoleum Hammered Gray to match my lantern - this will last you
- Drill
- drop cloth
- (1) lamp kit - I got mine at txlampparts.com. You can get these kits at HD but they cost $8, mine was $5. Also since I was making a clear lamp I wanted a clear cord. The kits at HD have an UGLY brown cord...just something to think about.
- Optional - (1) Harp
- (1) Standard Gallon Paint Can Lid
- Safety Goggles
- 5/16" Drill Bit for Glass - We bought a 4 pack at HD - but 5/16" is what you need for the cord
- Phillips Head Screw Driver
- Hot Glue Gun
- 3/8" Drill bit (not pictured)
- Sharpie (not pictured)
- Handsaw (not pictured)
- A towel (not pictured)
- Lamp Shade of your choice (not pictured)
The anatomy of your lamp kit:
 |
| Lamp Kit from txlampparts.com |
- Pipe Nipple
- Harp Bottom
- Socket Cap
- Socket Shell
- Cord
- Washers
- Lock Nuts
- Finial
- Harp - This is not included in the lamp kit I bought, I bought this one for $0.90 each. But plan ahead what shade you're going to use b/c I didn't even use them.
How to:
- Step 1: Decide where you want your cord to be - mark it with a sharpie
- Step 2: Lay lantern down on towel, area where cord will go facing up. Anybody who is in the room should have safety glasses on. With 5/16" glass drill bit in, slowly start drilling hole for glass. This takes a couple of minutes. After your hole is complete, gently wipe the residue off your lantern. Set aside.
 |
| Drilling through the glass - Success! |
- Step 3: Measure to the center of your paint can lid and drill a hole in the center. If you ordered the lamp kit that I did, your pipe nipple is 1/4 IPS - you will need a 3/8" drill bit. If you didn't order that kit, measure the outside of your nipple by putting it up against the drill bits instead of just drilling until you find the right diameter.
- Step 4: Take your paint can lid, the harp, the harp bottom, and the finial and lay them out over a drop cloth in a well ventilated area.
- *Tip* I put all items on top of scrap wood so that they didn't stick to the drop cloth. If you have scrap wood, this makes spraying MUCH easier.
- *Tip* Decide what shade you want before buying the harp. I sprayed a harp and finial and then realized I don't need either one of them. It didn't take valuable time out of my life, but I did waste $2.00 on my (2) harps. I know I didn't break the bank, but still. Plan ahead.
- Step 5: Spray your items in 1 even coat. Make sure to be the appropriate distance back to avoid dripping. If you are using the hammered spray paint, it will look like it's bubbling - that is just the finish, don't respray or you will get an uneven finish.
- Step 6: - Now you wait until these items are finished...Sorry. :( Go start another project or play on pinterest
- Step 7: Once your spray paint is dry, flip your items over and spray the other side. Obviously the finial doesn't need to be flipped, but your harp, your harp bottom, and paint can lid should.
 |
| Wear your safety glasses when operating power tools! |
 |
| Place on scrap wood to keep from sticking to drop cloth! |
- Step 8: While you are waiting, you can cut your pipe nipple. The pipe nipple in the lamp kit comes 2 1/2" long, I cut mine to be 1". Measure out 1" and sharpie it. Carefully set your nipple in a vice or a clamp. Take a hand saw & cut.
- Step 9: Ok, is your paint dry? Are you sure? Great, let's start building this lamp.
- Step 10: Carefully thread your cord through the hole you drilled in the lantern, make sure you pull it through enough to reach the top.
- Step 11: Take your pipe nipple and thread it from the top down. Add a washer and lock nut to the bottom, tighten it up.
- Step 12: Add your harp bottom, then a locknut to the top and secure it tightly.
- Step 13:
There is a small black cap that comes with your lamp kit, place this in the bottom hole of your socket cap. Then take the socket cap and screw it onto the top of the pipe nipple.
- Step 14: Thread your wire up through the pipe nipple all the way to the top of your socket cap.
 |
| Adding Socket Cap & Threading the Wire Through |
- Step 15: Your cord is made up of 2 separate wires. They are already slightly apart, pull them apart so that you have about 1 1/2" of separation from the top.
- Step 16: Make an "Underwriters Knot" - see picture below.
 |
| The Underwriters Knot |
- Step 17: Look closely at the wires, one has writing on it, the other doesn't. The wire that has writing on it needs to be secured to the gold screw. Unscrew the gold screw with your phillips head and carefully make a little hook with your wire. **Tip from my husband after much frusteration - Loop your wire in the direction you are going to tighten the screw...ummm thank you.** Ok, so make your hook to the right (Righty tighty, lefty loosy). and then tighten your screw. Do the same with the plain wire on the silver screw.
- Remember, Writing on the wire goes with the gold screw. Plain wire - silver screw...that is your "neutral wire"
- If you purchased a different lamp kit, there may be ridges on one of the cords instead of writing, that is your neutral cord.
 |
| Wrapping your wire - neutral on silver, writing on gold |
- Step 18: Tighten your knot - feed the cord back into the lantern and pull the socket interior down into the socket cap. This may leave you with excess cord inside your lantern, carefully push/pull the cord out through your hole.
- Step 19: Add your socket shell & lock in place.
- Step 20: Add a light bulb, plug that bad boy in and turn it on - does it work? OMG you just became an electrician. High five yourself , jump up and down and do a happy dance...you just made a lamp. If it isn't working, you failed. Throw it in the trashcan. Just kidding, just kidding...we can fix it.
 |
| TA-DA |
- Did you plug it into a socket that requires a switch to turn it on? First check that. Still not working??
- Ok, check to make sure that you have the neutral wire on the silver screw and the cord with the writing on the gold screw. Remember, the neutral wire will have ribbing, or in my case the non-writing one. Still not working?
- Are your wires touching the screws? Did you make sure to wrap them in the screw direction? I'm giving you these tips for a reason, you know...

- Step 21: Un-plug your lamp and remove the light bulb. If you're happy with the length of your cord and where it lies in your lamp, time to glue your paint can lid in place. Squeeze a line of glue around the outside edge of your lantern and press your lamp lid (paint can lid) down firmly.
- Step 21: Put your harp on if you're using one, if not put your shade on. Put your bulb back in. Plug it in and YOU ARE FINISHED.
- Step 22: Step back and admire your amazing new lamp. Take pictures...text them, post them to facebook, post to pinterest, email them to everybody you know b/c you just made a lamp all by yourself...well with my amazing instructions, obviously. WAY TO GO!
 |
| Hello Gorgeous. |
 |
| My lamps in their new home. LOVE LOVE LOVE |
Project Cost Breakdown: $24.99 for the lantern, $5.10 for the lamp kit, $0.90 for the harp that I didn't use (oops!), $5 for spray paint, paint can lid - FREE, $8 for the drill bit, $24.99 for my lamp shade (you could definitely find a cheaper one) Total - $43.99 for just the lamp; $68.98 with the shade compared to $169 at Pottery Barn. That is a savings of 59.2% <insert pat on the back here>
What do you think of my knock off?? Finally my hoarding of pics and design inspiration has paid off. I know you can get lamps for cheaper than $69 pretty much anywhere, but this is for a knock off of the PB lamps I have been lusting over for ages. $69 vs. $169 for an almost identical lamp. Great job, me.
This project was super super fun to do and turned out exactly how I imagined it would. It's fast to complete minus waiting for the spray paint to dry. And to be honest, I probably didn't have to do it. The lid was really close in color to the metal on the lantern and with the shade I used you can't see it anyway. Live and learn.
Until next time...


Stopped over from Knock-off Decor to say thanks for sharing your hard work!
ReplyDeleteJust beautiful!
ReplyDeleteOMG!!! I LOVE your lamps!! Thanks Knock-off-Decor for sending me over to check them out!! Now, will you make me some??
ReplyDeleteholy cow!! i am so happy i stumbled on this page. i love love love your lamp shape over the PB version. awesome job. awesome indeed!!
ReplyDelete