Wednesday, August 15, 2012

MARGARITAVILLE TRAVEL ADVENTURES

Calling all Parrotheads! I'm now accepting donations:

margaritaville travel adventures

SERIOUSLY, Did this really just happen?!? A trip to KW planned around JB? Holy cow!

Please feel free to mail checks, money orders, spare change, send me money via paypal...whatever way you prefer. Those of you that know me know that this has my name written all over it.

hahahaha


Knock Off Pottery Barn Lamp

So remember I said I have an addiction to Pottery Barn? I wasn't joking. I probably have 30 of their catalogs saved in our house with pages tabbed of rooms I like/things I want (somebody call Hoarders). I also wander around the store and take pics of design ideas and store them in my iphone. Yea, before pinterest I had my own little version of "boards".

Anyway, one of my recently hoarded pictures was the caged table lamp. I loved everything about this lamp, except the price tag, $169.00 eek. Seemed like a good opportunity to DIY. It seemed easy enough, a lantern and a lamp kit and then TA-DA. Do you know how difficult it is to find a GOOD looking bubbled glass lantern?? Ummm impossible. So I gave up...would I never have these gorgeous lamps??

Long story shortish...my friend Kelly took me to The Christmas Tree Shops last weekend and there minding their own business were the most glorious things I've ever seen! BUBBLE GLASS LANTERNS - $24.99. Well little ladies, you're coming home with me. So here is my tale of how to make your own knock off pottery barn lamp.

The Inspiration  - Pottery Barn Caged Table Lamp 

Knock-off Caged Table Lamp


Tools Required (Per Lamp):


  1. Bubble Glass Lantern - I found mine at the Christmas Tree Shops
  2. (1) Can of Spray Paint - I used Rustoleum Hammered Gray to match my lantern - this will last you 
  3. Drill
  4. drop cloth
  5. (1) lamp kit - I got mine at txlampparts.com. You can get these kits at HD but they cost $8, mine was $5. Also since I was making a clear lamp I wanted a clear cord. The kits at HD have an UGLY brown cord...just something to think about. 
  6. Optional - (1) Harp
  7. (1) Standard Gallon Paint Can Lid
  8. Safety Goggles
  9. 5/16" Drill Bit for Glass - We bought a 4 pack at HD - but 5/16" is what you need for the cord
  10. Phillips Head Screw Driver
  11. Hot Glue Gun
  12. 3/8" Drill bit (not pictured)
  13. Sharpie (not pictured)
  14. Handsaw (not pictured)
  15. A towel (not pictured)
  16. Lamp Shade of your choice (not pictured)


The anatomy of your lamp kit:

Lamp Kit from txlampparts.com
  1. Pipe Nipple
  2. Harp Bottom
  3. Socket Cap
  4. Socket Shell
  5. Cord
  6. Washers
  7. Lock Nuts 
  8. Finial
  9. Harp - This is not included in the lamp kit I bought, I bought this one for $0.90 each. But plan ahead what shade you're going to use b/c I didn't even use them.

How to:

  • Step 1: Decide where you want your cord to be - mark it with a sharpie 
  • Step 2: Lay lantern down on towel, area where cord will go facing up. Anybody who is in the room should have safety glasses on. With 5/16" glass drill bit in, slowly start drilling hole for glass. This takes a couple of minutes. After your hole is complete, gently wipe the residue off your lantern. Set aside.
Drilling through the glass - Success! 
  • Step 3: Measure to the center of your paint can lid and drill a hole in the center. If you ordered the lamp kit that I did, your pipe nipple is 1/4 IPS - you will need a 3/8" drill bit. If you didn't order that kit, measure the outside of your nipple by putting it up against the drill bits instead of just drilling until you find the right diameter. 
  • Step 4: Take your paint can lid, the harp, the harp bottom, and the finial and lay them out over a drop cloth in a well ventilated area. 
    • *Tip* I put all items on top of scrap wood so that they didn't stick to the drop cloth. If you have scrap wood, this makes spraying MUCH easier. 
    • *Tip* Decide what shade you want before buying the harp. I sprayed a harp and finial and then realized I don't need either one of them. It didn't take valuable time out of my life, but I did waste $2.00 on my (2) harps. I know I didn't break the bank, but still. Plan ahead. 
  • Step 5: Spray your items in 1 even coat. Make sure to be the appropriate distance back to avoid dripping. If you are using the hammered spray paint, it will look like it's bubbling - that is just the finish, don't respray or you will get an uneven finish. 
  • Step 6: - Now you wait until these items are finished...Sorry. :( Go start another project or play on pinterest 
  • Step 7: Once your spray paint is dry, flip your items over and spray the other side. Obviously the finial doesn't need to be flipped, but your harp, your harp bottom, and paint can lid should. 
Wear your safety glasses when operating power tools! 
Place on scrap wood to keep from sticking to drop cloth! 
  • Step 8: While you are waiting, you can cut your pipe nipple. The pipe nipple in the lamp kit comes 2 1/2" long, I cut mine to be 1". Measure out 1" and sharpie it. Carefully set your nipple in a vice or a clamp. Take a hand saw & cut. 
  • Step 9: Ok, is your paint dry? Are you sure? Great, let's start building this lamp.
  • Step 10: Carefully thread your cord through the hole you drilled in the lantern, make sure you pull it through enough to reach the top.
  • Step 11: Take your pipe nipple and thread it from the top down. Add a washer and lock nut to the bottom, tighten it up. 
  • Step 12: Add your harp bottom, then a locknut to the top and secure it tightly.
  • Step 13:  There is a small black cap that comes with your lamp kit, place this in the bottom hole of your socket cap. Then take the socket cap and screw it onto the top of the pipe nipple.
  • Step 14: Thread your wire up through the pipe nipple all the way to the top of your socket cap.
Adding Socket Cap & Threading the Wire Through
  • Step 15: Your cord is made up of 2 separate wires. They are already slightly apart, pull them apart so that you have about 1 1/2" of separation from the top. 
  • Step 16: Make an "Underwriters Knot" - see picture below. 
The Underwriters Knot
  • Step 17: Look closely at the wires, one has writing on it, the other doesn't. The wire that has writing on it needs to be secured to the gold screw. Unscrew the gold screw with your phillips head and carefully make a little hook with your wire. **Tip from my husband after much frusteration - Loop your wire in the direction you are going to tighten the screw...ummm thank you.** Ok, so make your hook to the right (Righty tighty, lefty loosy). and then tighten your screw. Do the same with the plain wire on the silver screw.
    • Remember, Writing on the wire goes with the gold screw. Plain wire - silver screw...that is your "neutral wire"
    • If you purchased a different lamp kit, there may be ridges on one of the cords instead of writing, that is your neutral cord. 
Wrapping your wire - neutral on silver, writing on gold
  • Step 18: Tighten your knot - feed the cord back into the lantern and pull the socket interior down into the socket cap. This may leave you with excess cord inside your lantern, carefully push/pull the cord out through your hole. 
  • Step 19: Add your socket shell & lock in place.
  • Step 20: Add a light bulb, plug that bad boy in and turn it on - does it work? OMG you just became an electrician. High five yourself , jump up and down and do a happy dance...you just made a lamp. If it isn't working, you failed. Throw it in the trashcan. Just kidding, just kidding...we can fix it. 
TA-DA
    • Did you plug it into a socket that requires a switch to turn it on? First check that. Still not working?? 
    • Ok, check to make sure that you have the neutral wire on the silver screw and the cord with the writing on the gold screw. Remember, the neutral wire will have ribbing, or in my case the non-writing one. Still not working? 
    • Are your wires touching the screws? Did you make sure to wrap them in the screw direction? I'm giving you these tips for a reason, you know... 
 
  • Step 21: Un-plug your lamp and remove the light bulb. If you're happy with the length of your cord and where it lies in your lamp, time to glue your paint can lid in place. Squeeze a line of glue around the outside edge of your lantern and press your lamp lid (paint can lid) down firmly.
  • Step 21: Put your harp on if you're using one, if not put your shade on. Put your bulb back in. Plug it in and YOU ARE FINISHED.
  • Step 22: Step back and admire your amazing new lamp. Take pictures...text them, post them to facebook, post to pinterest, email them to everybody you know b/c you just made a lamp all by yourself...well with my amazing instructions, obviously. WAY TO GO! 
Hello Gorgeous.
My lamps in their new home. LOVE LOVE LOVE
Project Cost Breakdown:  $24.99 for the lantern, $5.10 for the lamp kit, $0.90 for the harp that I didn't use (oops!), $5 for spray paint, paint can lid - FREE, $8 for the drill bit, $24.99 for my lamp shade (you could definitely find a cheaper one) Total - $43.99 for just the lamp; $68.98 with the shade compared to $169 at Pottery Barn. That is a savings of 59.2% <insert pat on the back here>

What do you think of my knock off?? Finally my hoarding of pics and design inspiration has paid off. I know you can get lamps for cheaper than $69 pretty much anywhere, but this is for a knock off of the PB lamps I have been lusting over for ages. $69 vs. $169 for an almost identical lamp. Great job, me.

This project was super super fun to do and turned out exactly how I imagined it would. It's fast to complete minus waiting for the spray paint to dry. And to be honest, I probably didn't have to do it. The lid was really close in color to the metal on the lantern and with the shade I used you can't see it anyway. Live and learn.

Until next time...

Friday, August 10, 2012

Good Will Dresser Make Over

So about 3 months ago I was in Good Will searching for hurricane vases to do a super fantastic outdoor lantern project that I found here at inmyownstyle.com. If you have never been to this site, you should visit it immediately. This site is life changing!  But I digress. So ofcourse, being a woman I went in for one thing and came out with something completely unrelated. There was the most beautiful dresser next to the glass section, just BEGGING me to take it home, I mean it practically crawled into the truck.
Hello Beautiful!
Some of the drawers were sticking because it was painted white already but I could see the wood underneath the chipping paint was in great shape. The sticking drawers didn't bother me - the structure was sound, all the original hardware was there, the shape and size were GORGEOUS. Oh, did I mention the price tag? $42. SOLD!

Ok, so my beautiful new dresser and I are on our way home...2 months go by...and it's time to make this beauty into all she can be! No, she's not joining the army. So here we go!

I knew exactly what color I wanted it to be, my favorite - green. Pottery Barn has the most BEAUTIFUL piece called the Daniella Chest that is an antique inspired green bedside table. Small and pricey but oh so gorgeous...thank you PB for my color palette!
Inspiration - Daniella Chest via Pottery Barn

From Trash to Treasure!


Tools Required:

  1. Paint of Your Choice - I only used about 1/4 of a gallon of Behr Premium Plus, Flat - Color Matched to Valspar Dog Park *If you want to make it chalk paint, mix with white unsanded grout*
  2. Wood Putty - I used Dap Plastic Wood
  3. Stain - I used Oil Based Minwax Jacobean
  4. Polyurethane - I used Minwax Oil Based Satin Finish
  5. Sand Paper - 150 Grit & 220 Grit
  6. Sander - Not required, but makes life easier
  7. Putty Knife (For Wood Putty)
  8. Paint Brush - Regular Synthetic for Paint
  9. Paint Brush - Natural Fiber only required if using oil based stains & poly
  10. Foam Brushes - For Polyurethane
  11. Spray Paint - If reusing hardware; I used Rustoleum Oil Rubbed Bronze (LOVE)
  12. Rubber Gloves
  13. Mineral Spirits - Only required if you're using oil based stain/poly - used for washing brushes
  14. Paint Thinner - Only required if you are reusing hardware and if it's painted

Here we go...

  • Step 1 - Carefully unstick the drawers and remove them. Don't yank b/c you could damage the hardware, try pushing Only 3 of them were sticking so out of 9 that's not too bad. 
  • Step 2 - Remove the hardware. Again, don't yank. I reused mine, so I set mine aside and placed all the screws in a plastic ziplock baggy until I needed to reuse them - we will come back to how to remove the GLOPPED on paint.
  • Step 3 - Fill any gashes, holes, chunks, scratches etc. If you are going for the farmhouse look, keep the gashes if you want. I had about a 2" hole in one of my legs that I wasn't feeling. I like a little age on my furniture but not the shark attack look. I used Dap Plastic Wood, applied with a putty knife. Here are some helpful tips when using Plastic Wood:
    • Tip 1 - This comes upside down, keep it stored this way when not in use
    • Tip 2 - This stuff dries VERY fast, so work quickly!
    • Tip 3 - It says on the little tin to apply a thin layer, let it dry and then come back and repeat if you have a deep/large hole - there is a reason for this being on the can...listen to this advice! Ok?
    • Tip 4 - Remember to close it when you're done unless you want a dried up can. :)
  • Step 4 -  Let your plastic wood dry, sand your plastic wood and any other areas that have paint drips on both the dresser body and the drawers - Obviously if you are refinishing a piece without  paint on it, this step doesn't apply. Whoever painted my dresser might have been tipsy. So I had some sanding to do. I also did some EXTRA sanding b/c I wanted some of my wood to show through in the finished product. **Make sure to sand with the grain**
  • Step 5 - Clean, clean, clean!! Scrub this bad boy down...clean the outside, inside, underside...any side you can find! I did a blow dry with our air compressor (use a dust broom if you don't have an air compressor...you don't have an air compressor??!) and then some soap and water as well. After all, this is going to house my collection of beautiful clothes! 
  • Step 6 - Time to PAINT! ! I used Behr Premium Plus in a color matched color to Valspar Dog Park, Flat. Yes, I could've used Valspar Paint, but I personally don't like it. Just a personal preference. Just like I'm a Target girl, I'm a Behr/Home Depot Girl. You can use whatever your heart desires. 
    • **Tip** If you're painting on plain wood, try mixing 1 cup of paint with 2 tsp. of grout to make your own chalk paint - it will adhere better to the furniture.
    • Tip 2 - If you have a Benjamin Moore or Sherwin Williams color you like, just bring the swatch to HD or Lowes - they got this color spot on! Why pay full price when you don't have to?? 
    • Tip 3 - I bought an entire gallon of this paint b/c I'm ummm obsessed with the color. You absolutely do not need a gallon of paint. I used about 1/4. I will be using this color elsewhere in the house. 
  • Paint 2 coats of your desired paint - letting it dry the appropriate amount of time in between. I painted my first coat, then came back the next day b/c I was doing this on weeknights. I didn't use any special type of brush, just a regular Purdy that you would use for the walls. If you don't know what a Purdy brush is, you should...they are the best! 
    • Close up of Color
      After 2 Coats of Paint!
Painted drawers sans hardware
  • Step 7 - Sand! Again? Yes! Sand again! This is so that the wood will show through, and in my case some of the white paint as well. I was going for the distressed look. So sand your heart out! Doesn't have to be a lot, I used 150 grit. Rough that baby up as desired. Wherever the wood is showing will become darker with your stain color choice. **Remember, we're sanding with the grain!**
  • Step 8 - clean up again - air compressor & broom! 
  • Step 9 - time to antique! I used minwax jacobean - now this is an oil based stain. I was doing this in an open garage. If you are in a basement or a room without ventilation you should not pick an oil base! Since I had an oil base stain, I used my natural fiber brush and got to staining. Now it says on the stain to only let this stay on for like 3 minutes? And not to put it over paint...oh well! Worked for me! Infact...I left ALL of my stain on without wiping it off! Shhh...don't tell Bob Villa on me. 
    • Ok, so I left the stain on b/c I had an inspiration piece in my head. I wanted a much darker dirtier green piece. Should you leave the stain on? Probably not. My brush marks were ruined in the poly stage but I was able to re-work the stain with the poly and "make it work". - Tim Gund fans? Anybody? In reality, you should do multiple thin layers and wipe them off per their instructions...but I'm telling you what I DID and it worked out for me.
    • Some tips when staining:
      • Do yourself a huge favor and wear plastic gloves unless you want to look like you've been digging in A LOT of dirt!
      • Work in small areas at a time. Areas I did at a time - the side of the dresser, worked in 1 drawer area at a time before moving to the next. I did the top last.
      • If you don't want brush marks - use a foam brush. I wanted the aged look so I wanted the brush marks.
      • Yes, you should wipe it off...but I didn't and I lived to tell the tale! 
      • If you have a drip mark or don't like the way the stain looks in a certain area, reapply more stain as quickly as possible - this worked for me. 
      • If you're going for the antique / french look - apply more stain in the corners or in any detailing. 
      • Again, I used oil-based stain b/c I was in my garage with a fan on, doors open...plenty of ventilation. If you are indoors, use water based stain! - There is actually a much wider variety of colors available if you want water based. You can pick a color and bring it to the paint station and have it tinted JUST FOR YOU! 
      • Why did I pick oil-based then? I picked oil-based b/c I just LOVE using mineral spirits to clean my brushes! hahahah No, I used oil-based stain b/c oil-based poly will yellow over time while water-based will not. I wanted the yellowing affect b/c I thought it would give that extra punch of authenticity to my dresser. If you are going for a cleaner look or using a color that won't look so hot with a yellow tinge...again go for water based. 

Close up - See the white turned yellow from the stain, all that sanding paid off ...ooo la la
Stain added - Minwax Jacobean
Staining in the details  for the aged affect. GORGEOUS DAWLING!
The top - pre-poly disaster which actually made it look better. I used  long brush strokes to achieve this effect. Remember, if you don't like how your stain looks, quickly apply some more on and re configure! 

I bet this baby would sell for more than $42! 
  • OK, so once you have your stain applied (and wiped off if you aren't as brave as me), it is time for the worst part - Poly! I don't know what it is that I hate about this glop...but OMG I hate it. Ok, so again, I used oil-based satin finish polyurethane. If you used water based stain, you should use water based poly. If you're using oil based, you will need to use a natural fiber brush or foam applicator. Apply this in the same fashion that you applied your stain. As I mentioned earlier - oil based will naturally yellow over time, water will stay clear. 
  • Once the poly has completely dried, COMPLETELY, I mean not tacky AT ALL...yea, Ron tried to help me out by sanding for me before I got home and it was still tacky, I had a polka dotted dresser...don't go down that road...OK? Sand your dresser again, for the millionth time this time with a fine sand paper - like 220. 
  • Reapply a FINAL coat of poly. If you don't want brush marks, use a foam brush. If you see a line when it's wet, you will see that line forever so have a make it work moment and do a good job! 
  • Now back to your knobs...soak those puppies in paint thinner in a metal container* -we used an old pie dish for atleast 2 days. Have them covered completely and when all the paint thinner is evapporated, that is when it is time to remove the knobs. By this time you should be able to peel the old paint off. 
    • *Fun fact - did you know that if you put paint thinner or mineral spirits in thin plastic like a solo cup it will burn through it? I didn't! Learn from my mistakes!! 
  • Buff any extra paint out of nooks and crannies
  • Lay all hardware out on a large plastic drop cloth
  • I painted mine with Rustoleum Oil Rubbed Bronze.
  • Spray 2 coats - waiting appropriate time in between, make sure you step back the appropriate distance when you're spraying and don't overspray. Otherwise you will be peeling these off your plastic drop cloth! I know you want them COATED with the first coat b/c you're impatient like me, but it's ok to do 2 coats and be patient...we've come this far! 
  • Now has come the time to put your drawer pulls back in, put your drawers back in the dresser and admire your amazing handy work!! 
My Knobs with a face lift!
All about the Details  - Top, Legs, Exposed Wood / Previous Paint & Ofcourse  My Refinished Knobs! 
TA-DA!!!!!!!
Here is the best part of my work, you know other than the fact that I have a 1 of a kind piece that I put my hard work, SWEAT, and love into and I will have it to cherish for the rest of my life...I found the stamp of who the dresser is made by, Drexel Heritage. I called a company who sells almost the exact dresser - retail cost $2300. Not too shabby for a $90 total project.

Just a refresher of the transformation!
Not too shabby!
So hopefully my project has inspired you to take the plunge and give furniture refinishing a try! Remember I told you that I'm crazy OCD? I didn't anticipate this turning out exactly how I planned. I was VERY stressed about the staining and it coming out how I wanted it. Even though I like the rustic/antique look...it needs to look like it is actually antique, not like I tried to make it that way...you know? I was super super stressed but it actually worked out exactly how I planned, if not better. This is a zero corona/vino induced project. Just take the plunge and you will love every minute of it, I promise! I mean, look at your end result...how could you not?

Until next time...

Thursday, August 9, 2012

My Quest for Pickled Okra

So 2 years ago when visiting Charleston, Ron and I had breakfast at a restaurant called Toast!. If you are ever in Charleston and have the opportunity to go there, please do...it is DELICIOUS! Anyway, I ordered a bloody mary that arrived with what appeared to be a SLUG coming out of it...my first experience with Pickled Okra. I was alarmed to say the least, but after much persuasion I tried it. Well hello best thing ever! I had to have more. We popped into Charleston again this summer and we revisited Toast! just to have pickled okra again and THEY WERE OUT! Are you kidding me?!

Now I am a lover of all things salty - chips, pretzels, olives, pickles...get in my belly! So now pickled okra goes on my list! But where do I find this amazingness? We live in northern Southern Maryland (make sense?) and I pass a farmers market every Saturday on my way to do errands. And what is that sign I see? OKRA!!!! Step 1 - Buy OKRA!!! Remember, now that pinterest exists I believe I can do all things!

Step 2 - Google how to pickle Okra! I found a recipe at SouthernLiving.com and I trust them. So here is what you will need:

Ingredients:

  1. Okra - I had about a lb, their recipe says 2 1/2 lbs
  2.  4 cups of white vinegar
  3. 4 cups of water
  4. 1/2 cup kosher salt
  5. 1/4 cup sugar
  6. Dill Seeds* - (1) tsp. per mason jar
  7. Chili Peppers - (1) per mason jar
  8. Fresh Garlic Cloves - (1) per mason jar
*Fun Fact about Dill Seeds - They don't sell these in grocery stores. So don't go to Giant all ready to pickle and then strike out wandering the spice and pickle isle...like I did! Plan ahead! I got mine here at nuts.com . I ordered at like 8pm & they came the next day! Shipping is a little pricey, but I thought i would be getting a McCormick spice for like $8.00 so $10.00 for a lb is actually pretty sweet! 


Tools Required:

  1. Mason Jars - I needed (2)
  2. Canner - I didn't have one, I wish I did...if you don't have one, you will see I used my le-cruset dutch oven with a rack on the bottom
  3. 2 quart sauce pan
  4. 1 quart sauce pan
  5. Jar Lifter - I didn't have one, I wish I did...if you don't use tongs
  6. Kitchen Towel
  7. Oven Mitts! 
  8. Ingredients - Dill Seed, White Vinegar, Sugar, Kosher Salt, Garlic, Okra (Duh!) and Chili Peppers

Ok, time to pickle! 

  • In a canner or dutch oven with a rack, place your jars in and cover with HOT water. If you're using a dutch oven, you're going to have to lay your jars down. I cheated and pre-boiled some water and then added some additional hot water. It's ok for this step, this is just to sanitize your jars. Once your jars are covered, Put the lid on and let the water come to a boil. Keep the jars in the boiling water for 10 minutes. 
  • Everything Boiling away & Washing the Okra
  • Meanwhile, in the 1 quart sauce pan, place the screw cap and lid of your mason jars also in hot water, cover and let them boil for 10 minutes as well. Everything is boiling!
  • Take your 4 cups of water, 4 cups of vinegar, 1/2 cup of salt and 1/4 cup of sugar and place them all into the 2 quart sauce pan. Cook over med-high heat until they boil. While this is cooking, wash your okra, chili peppers and prepare your cloves of garlic.
  • Once your jars have boiled for 10 minutes, CAREFULLY remove them with a jar lifter. I didn't have a jar lifter so I had to use tongs. This part is horrible without the proper canning tools. It can be done, but PLEASE make sure you are wearing oven mitts - I had some hot hands from trial and error...learn from my mistakes! Take your jars out 1 at a time and place them upside down on a clean kitchen towel for 1 minute to let them cool off. 
    Vinegar, Water, Salt, & Sugar - Your Pickling Brine
  • After the 1 minute, turn them over WITH YOUR OVEN MITTS on and start packing your okra in. Some sites said to put them with the stems up, Southern Living didn't mention that so I just packed them in. After the okra is in, add 1 tsp. of dill seeds to each jar, 1 garlic clove and 1 chili pepper. I cut just the stem off my chili peppers - nobody told me to do this, I just felt like that would help it release the flavor. 
Packed Okra in HOT Mason Jars - Add Dill, Garlic Cloves & Chili Peppers! 
  • After your vinegar/water concoction has come to a boil, pour it over the okra jars, leaving 1/2" from the top - I poured mine to right below the rim, seal immediately. 
  • Take the HOT JARS **Wearing Oven Mitts** and put them back in your dutch oven or canner. and cover with 2 inches of water. Now this part takes forever! Bring the water to a rolling boil...Go read a book or you know, make a quilt! I swear this took 40 minutes for my water to boil! ...I'm impatient! After the water is at a rolling boil, let it boil for 10 minutes, uncovered. Remove from the heat and let it cool in there for 5 minutes and then **WEARING YOUR OVEN MITTS** put them on a cutting board to let them sit for 12-24 hours.
Hot Pickling Liquid in Sealed Jars - Bring to a ROLLING Boil. 
  • After 12-24 hours, check the seal, if they are concave, you have a good seal.
TA-DA!!!!!!
Southern Living says they will be good for 1 year. Just store in a cool, dry space. So there you have it - pickled Okra!

What did we learn today? Oven Mitts are a must! Dill Seeds are not sold in grocery stores! Southern Living knows all b/c they do not say to sub a canner with a pot or tongs for a jar lifter...

I just did this lastnight so I haven't tasted mine yet, but I did check my jars about an hour ago and they were concave! VICTORY!!!!

Until next time...

Just a Quickie!

Last post about my girl crushes...I swear!

But have you ever wondered why sand doesn't stick to beach volleyball players? Go over to yahoo sports and read this great article written by Chris Chase. 

Now at least you learned something today...

Ps.com how many people are really focusing on sand vs. no sand on their bodies anyway? Just saying! 

Three-peat for the Golden Girls

No matter which team won lastnight in Beach Volleyball we were going to hear the National Anthem played...hurray for USA! That being said...just admit you wanted Treanor-Walsh to win their 3rd gold!! Well your wish is their command!
Walsh/Treanor Winning their 3rd Olympic Gold - LOVE!
Step aside Michael Phelps...you may be the most decorated Olympian of all time, but these, "Golden Girls" now have also three-peated in their event as well. Never lost a match and only 1 set in 3 Olympics....ummm Michael, can you say you never lost?? I don't think so! Not hating on Michael Phelps...he is great at what he does...just loving on Misty May and Kerri Walsh...that's all.

Oh, and as if I didn't already have a big enough crush on this pair, what surfaces on facebook yesterday?? Spotted - Misty May patronizing Chipotle. What? You win gold medals, crush every team you ever encounter, have a 6 pack, perfectly manucured nails (did you notice that?? everytime!), and you eat burritos? Ok, you are now my hero!
Misty May-Treanor @ Chipotle in London
Burritos and Beach Volleyball - That's what 3 time Gold Medalist do!

Wednesday, August 8, 2012

DIY Lamp Inspiration

Oh I'm so excited! I am currently waiting impatiently for my lamp kit from txlampparts to arrive so that I can make my knock-off PB Caged Glass Table Lamps . Stay Tuned - for how to, parts, and results... I have a feeling they are going to be aaaamazing! But anyway, since I now know everything any 28 year old female ever needed to know about lamps and parts, I have my wheels turning and decided that Heidi needs to make her own lamps too.

Take a ride with me...
PB Serena Antique Mercury Glass Table Lamps
The lamp on the left is the inspiration for Heidi's DIY project. Retail price $100.00...actually on the cheaper side for PB.

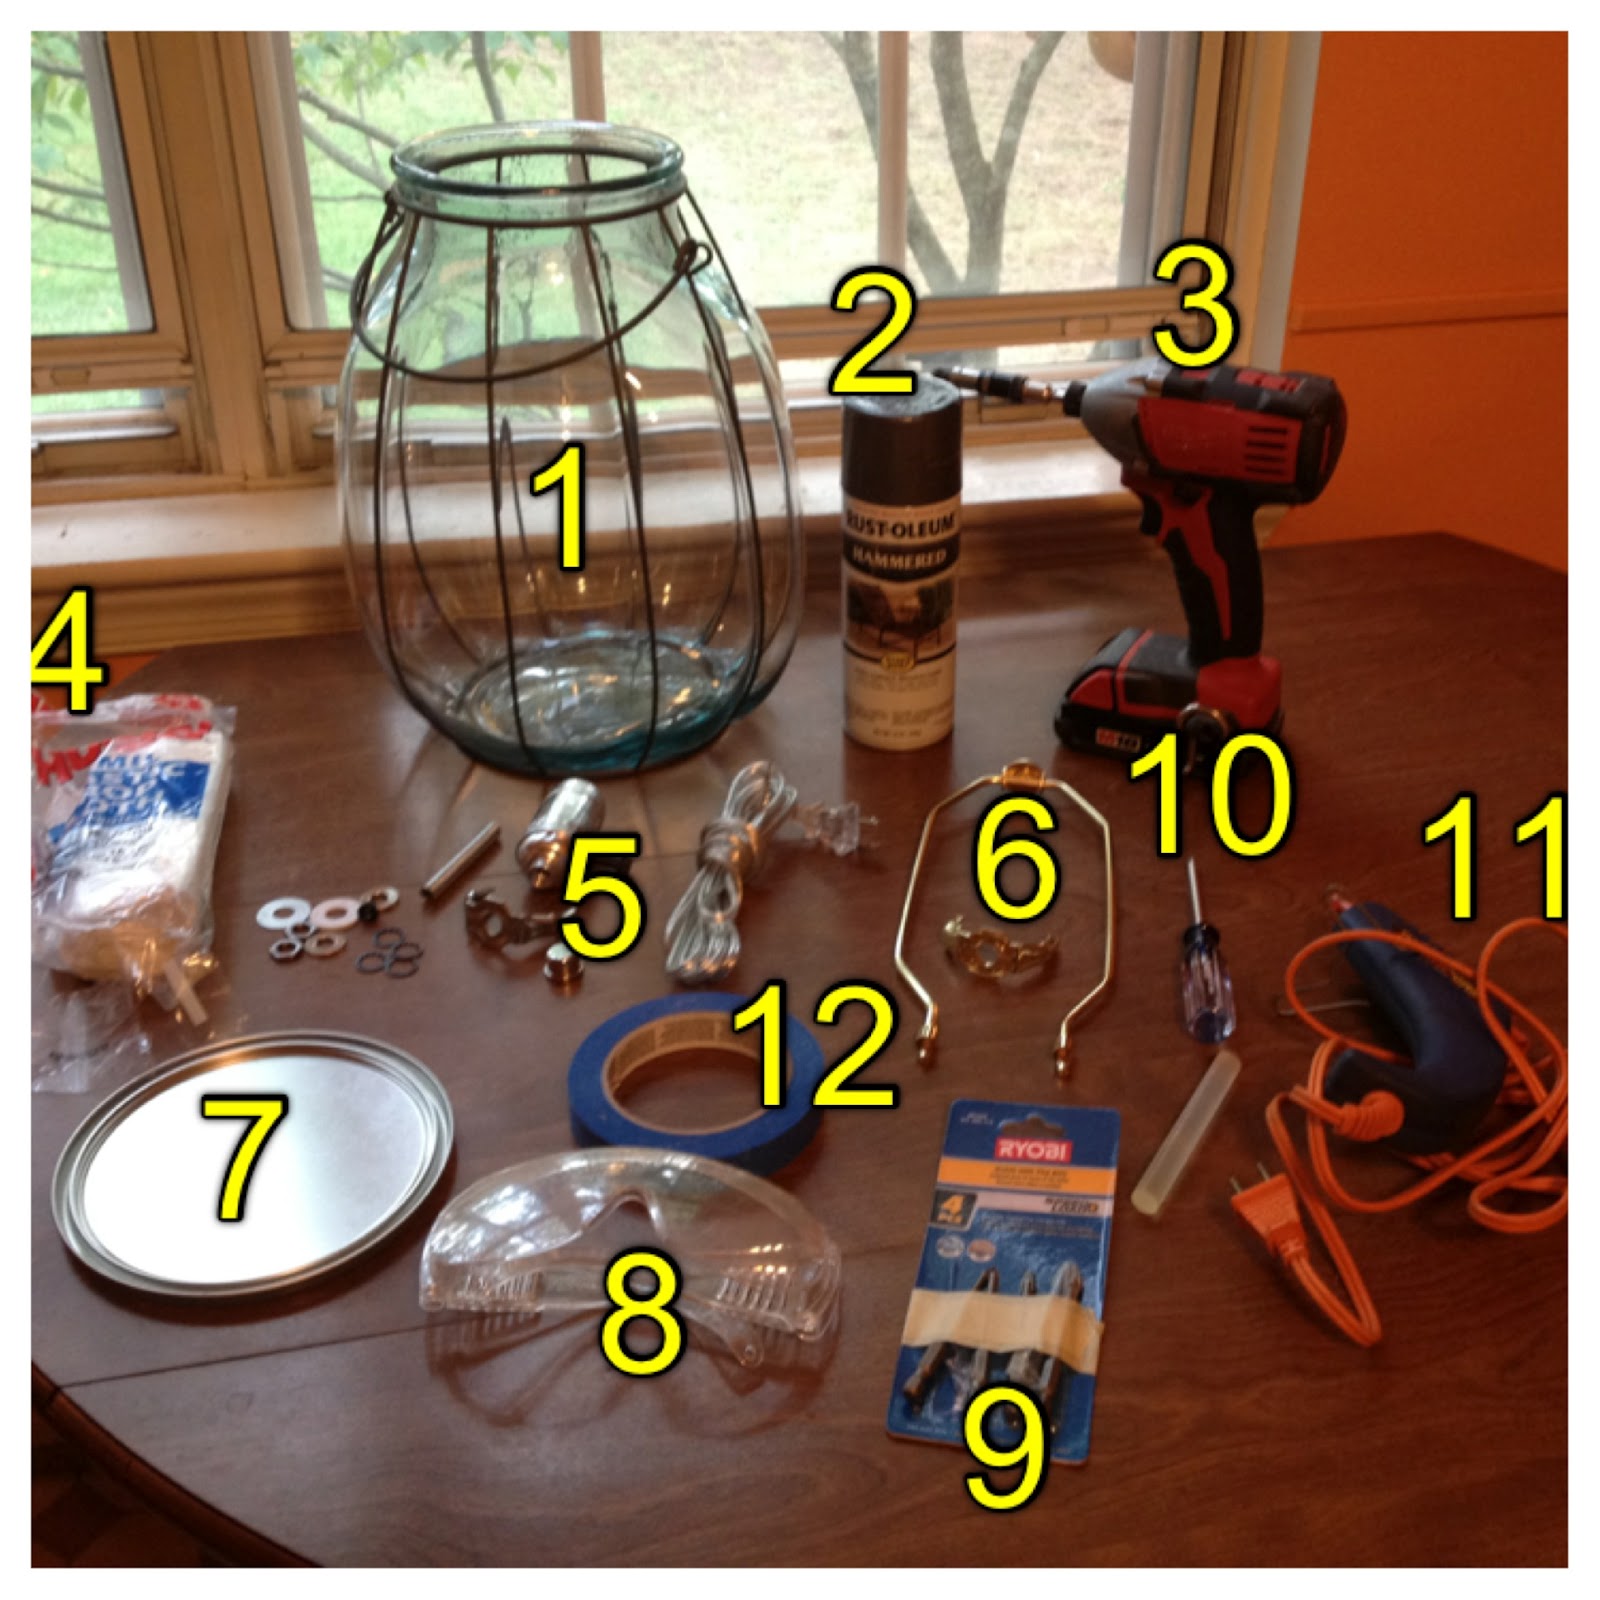
So, we turn to my recent knowledge of lamp making...I know that I need a diamond bit to drill through glass, we have that to make my lamps! Check! Step 2 - the glass - Can we say apothecary jar? Hello!

Do you see the shape? Looks pretty perfect to me. You can get one of these for about $15.00 at Michaels or Homegoods - maybe even less if you get a Michaels coupon! So then we buy the lamp kit & harp from my new bffs at txlampparts.com - I'm doing the silver one with a clear cord b/c this is glass. We'll need to remove the top part of the lid so the cord can go through, but thanks to pinterest via Picklee I know How to Break the Bottle. Is pinterest not the best thing since sliced bread?? Sooo we have the glass, we have the bottle broken, we have power but Melissa, this glass is clear, the lamp is mercury...well now comes my other favorite website - PINTEREST!!! Pinned via Dream to Life all you need to do is spray some water, then spray Krylon Looking glass spray paint and then BAM! DIY Mercury Glass.

Ok, so we have the glass look achieved. NOW, we can leave  it flat OR I just found today thanks to addictedtodecorating.com - we can add a ceiling pendant thing to the foot - depending on which apoth jar we use. How pretty would that be at the bottom?

Ceiling Pendant for Light Fixture glued to a piece of wood - Brilliant! 
Adds a little more height if desired, paint it to match the glass and then BAM! Instant lamp. Anybody else made a lamp out of random things around the house? Had success or failure? I'm going to be starting on mine tomorrow I believe and just wait till you see what random part I'm using...it's going to be fun!!

Tune in later for when I actually make this, because I will. I can't get it out of my head...Heidi will have these lamps in her house!

By the way, if you are wondering, where do I get this magical paint that makes mirror out of regular glass? Home depot? NO! Lowes? Try again! Michaels? NOPE! Are you ready for this tragic news?? WALMART! UGH! Do yourself a favor and go online and check the store before you fight the POW for no reason. Not trying to be snotty, I'm just a target girl.

Yea, that's me! 
Until next time!